Monday 27 April 2015

Rapid Fire! 20mm - Pz Sfl II for Rommel's Kampfstaffel, El Alamein 1942, part 2


Now for the complete model. 

The Pz Sfl II in the probably  best picture of this machine (from 5 or 6 available). There are no exact measures for this vehicle which gives some freedom of construction. You can also use the measurements for Hkp 902 chassis used on other more well known German AFV's. 


The model turned out like this. There is an extra road wheel taken from a surplus model and glued to this one in order to have a total of seven.

The jerrycans are home made and you can see how to manufacture them in this fantastic blog ( it's not me who say it it's the crowd out there !) from two posts ago. 


The crew are the PSC (many!) surplus models of the Marder II. 


The gun tube was taken from a broken  Esci 7,5cm PAK  with an Evergreen sleeve added. 


The usual GW GreenStuff was used for bedrolls.
 

The gun mantlet is a piece of carved hard styrofoam. 


Small details like shovels and such were taken out from an Esci Sdkfz 251 veteran of many battles cannibalised for parts.

Next: painting the Pz Sfl II. 

RapidFire! 20mm - Pz Sfl II for Rommel Kampfstaffel - El Alamein 1942,part 1.


In the next 3 articles I will show you my way to make the model of the Pz Sfl II in 20mm. I couldn't find any kit of this model in 1/72nd or 1/76th scale so only  scratchbuilding remained as the solution.

As there was only two built, one model is more than enough for the DAK and Rommel's Kampfstaffel.


I´ve been looking at the wheels and tracks of the very strange and big Atlantic Kettenkraftrad for many years, after using their quite a lot of their seated German soldiers and even some MG´s. As a compulsive buyer of these old kits I have several of them. One day I was expecting for these material to become useful.
 
The web presents some 1/35th kits of the real machine and also some scratchbuilding both in 1/35th and (apparently) 20mm but i'm not sure of the last one as the site was in Japanese which is not my best foreign langauge.
 
Write "Pz Sfl II" or "hkp 902 chassis" ( the base of the vehicle) in your search engine for lots of information.
 

Use some Evergreen and hard Styrofoam for the chassis. Glue or drill the parts. I did both for strengthening.
 

A plate of Evergreen is used as the top part of the chassis and modelled as you can see.


The top part of the chassis needs careful planning as it needs to house a number of features.
 

The turret need to pivot. This is the bottom part...
 

...and this one is the top part.


It starts to look like the real thing.


The shape of the turret is quite tricky. In order to avoid too many calculations I use flexible paper card for essays and only after the Evergreen card.
 
Next: The Pz Slf II detailed and assembled.


Saturday 18 April 2015

Rapid Fire! 20mm - A way to do Jerrycans


Jerrycans are one of the first things to end in our surplus boxes. 

They were used by the main contenders of WWII and virtually all modern wars and we never have enough of them, specially when you are into desert fighting. 

So I made up an easy and cheap way to do as many as I want. This is the result: 


Do like this: use a hard kind of styrofoam, the kind that comes in 3mm thick and about 60x120cm plates and that you can find in DIY. With a little luck your local supermarket can give you some of this material as some brands use it for advertisements.


Mark rectangles with the blunt part of your X-acto 7x4mm (approximately or the size you like) and then cut them. 


Cut a small top fraction to mark the handler. 


Use the blunt part of the X-Acto to make a hole for the handler. Press deep. 


Do the same for the characteristic X on the main surface. 


I also made an oblique cut at the petrol/water exit corner that you can see in the 1st picture. 

And here you have. Plenty jerrycans at no cost at all, only some time of course. 

Happy jerrycanning!!


Thursday 16 April 2015

Rapid Fire! 20mm, March 2015 DAK and 8th Army additions.


Last post material already painted.


The Krupp Protze and an extra Sdkfz 11 are always handy. I paint DAK vehicles with Tausept Ochre from GW. 


Sdkfz 251. The DAK symbol and its grey background are painted over the sand colour, the opposite way to reality.


The Italian 88's. I used GW Vomit Brown, a strange name but a nice colour for the Italians.


The Crusader II made from Frontline Wargaming hulls (from their AA Crusader I) and modified Airfix turrets. The Matchbox+Esci Pheasant is crewed by a "chinese" crew.  The colour for the British armour is Vallejo Yellow Ochre. 

I think the DAK colour is quite close. Both the Italian and British are not but as I already started these armies many dozen vehicles ago I will have to keep with these colours for the sake of uniformity. 


Now let's start with some more rare DAK vehicles like the most strange ones in Rommel's Kampfstaffel...


Thursday 9 April 2015

Rapid Fire! 20mm - WIP for the DAK and 8th Army


A few more models on the way. 


Playing with Matchbox Krupp Protze. 

The middle one has a Esci and Preiser crew with an Airfix driver. 

The 37mm PAK portee in an unconfirmed version for the DAK. Plenty were used in the Eastern Front so probably also in the desert. Up to  a few years most of the authors were denying the use of the Krupp 69 truck by the DAK until proved by photos. I hope the same happens to this PAK version.


Fujimi and Matchbox Sdkfz 251. 

The crew are from several plastic brands and also from metal Irregular Miniatures. 


Italian 88/55 AA/AT. 

Hasegawa 88mm with stripped mantlet as used by the Italians. 

The crew are mostly ESCI Italian mountain troops conversions. 


The 17pdr in the 25pdr carriage ( called "Pheasant"). Matchbox barrel and Esci carriage.

Most of the crew are cheap Chinese copies. But some are nice and big and make good conversions. 

Lastly two leftover turrets of the Airfix Crusader, originally the Mark III, turned into Mark II with the help of some Evergreen plastic tube and plate. 

They will be placed on two Frontline Miniatures Crusader AA with 40mm gun, a design that never saw action. 

Monday 6 April 2015

AOE 28mm Waterloo - Hougoumont compound and La Haie Sainte


From the French lines you would have a certain difficulty trying to grasp the size and importance of  Hougoumont in the morning of the Waterloo battle, adding to that some poor reconnaissance and maps.


Now you can't see them but on those days the woods of Hougoumont hide the complex from French eyes which led Napoleon not to pay the attention it deserved with catastrophic consequences for his side. 


The model of Hougoumont is an old Draper model bought from Miniatures Wargames a few years ago and I think still available. 


I followed mainly this drawing from the Carnets de la Campagne Vol.1, dedicated to Hougoumont. 


But in order to portray the full Hougoumont complex you need an orchard with an hedgerow looking at the French side ...
 

... and a garden enclosed by a new outer brick wall and an inner masonry wall. 


The pigeon house doesn't come in the model so you need to build it. This one is from card. I also made some thatched roofs using old pieces of linen as on the model on the Waterloo cyclorama. 


The famous South Gate of Hougoumont. 


The model of the chateau is designed for 20mm but goes well with 28mm as the true Hougoumont in 28mm fills any decent table leaving no room for anything else. 

Let's move a bit to the east. 


La Haie Sainte is the Airfix model with a few additions. 


It's necessary a small orchard looking south and a pond inside the farm...


... and also a garden looking north.


And here you have two of the main "breakwaters" of Wellington.

Saturday 4 April 2015

Rapid Fire! 20mm - Turning the Matchbox Sdkfz 232 into the Sdkfz 247Ausf. A - Part 2.


Finished! These two homemade 247's are ready to reinforce Rommel's two Panzer Divisions HQs. 

 
The many extra parts are intended to desguise the wrong shapes of these fake 247's. 

I hope these two are always seen at least from 1 meter distance so only a few can notice their many flaws ...

Regarding the nazi flag please understand this is no propaganda. It's just an accurate way to portray some of the DAK vehicles. You can enlarge them, print them and use them as toilet paper :)


Thursday 2 April 2015

Rapid Fire! 20mm - Turning the Matchbox Sdkfz 232 into the Sdkfz 247Ausf. A - Part 1.


Battistelli's Osprey Order of Battle on the Afrika Korps mentions the existence of two Sdkfz 247 in each of the 15th and 21st PD command groups.

The Matchbox Sdkfz 232 is a relatively good base for the 247 as it has 6 wheels and share some common components on its chassis. 

I checked a little more in other books and Internet and it seams that the models of the Sdkfz 247 must have been the Ausf. B (4 wheels) as only 10 of the Ausf. A (6 wheels) were produced. 

The problem, better, the problems were three. First the 6 wheel version is much nicer than the 4 wheel; second, I have already built a total of 8 Matchbox 232 from the times in which this pre-war vehicle fought happily alongside Panthers  in Normandy so two could be easily spared to become Sdkfz 247 Ausf.A for the Afrika Korps; third, this will look like the 247 only from a safety distance...


So grab your surplus 232, take out the turret and make the open area from the turret hole. 
Use X-Acto or small scissors to do so. 

This is the result. 


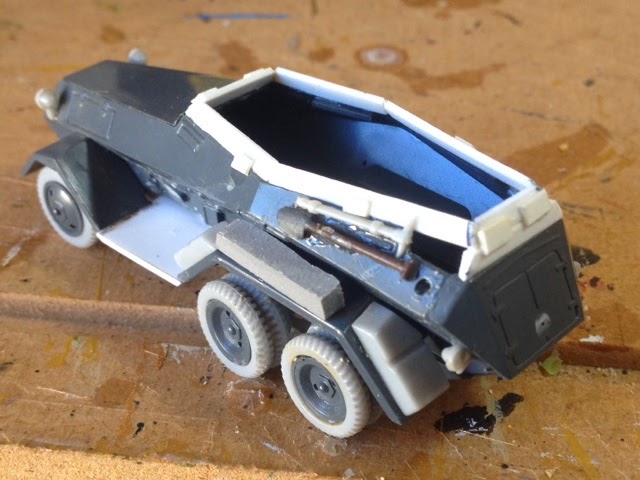
Then add Evergreen walls to the open part. I used 3mm tall beams as if you use taller the open area of the vehicle will be too small. I just kept on adding these rectangles until surrounding the entire area with no big measurements. 

Add extra boxes, vision slots, tools and climbing supports. 


The many holes left will be desguised with bags, jerrycans and backpacks. I used Valiant miniatures because they are big and as the Sdkfz 247 was a smaller vehicle than the 232 as you can see here...


...and the big 1/72nd scale figures go well inside the vehicle. 

Follow some good drawings as is the case of Bradford's plans in 1/72nd. The most noticeable difference at the end is the top part of the castle which should be some 4 or 5 mm longer enlarging the area for the figures and reducing the size of the nose. Another difference is the rear of the vehicle which has been disguised as you have seen.  But this is just a makeshift solution to make the rare model of the Sdkfz 247 Ausf. A, not the perfect solution. 

Also look for the lovely photos of the Gaso.line 1/48th scale 247 or even the Shapeways 1/87th model. 

But if you want no work and love your dozen Matchbox Sdkfz 232 already made order the SMA 20mm version of the 247 Ausf.A and save yourself a lot of work. But it's not as funny :)